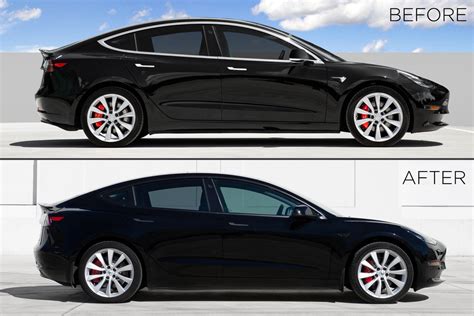
The Tesla Chrome Delete is a popular modification among Tesla owners who want to give their vehicle a sleek, modern look. By removing the chrome trim from the exterior of the vehicle, owners can achieve a more aggressive and sporty appearance. In this guide, we will walk you through the steps to complete a Tesla Chrome Delete, providing you with a comprehensive overview of the process and the necessary tools and materials.
Before we begin, it's essential to note that this modification is purely cosmetic and does not affect the performance or functionality of your Tesla. Additionally, it's crucial to follow proper procedures and take necessary precautions to avoid damaging your vehicle's paint or trim. With the right tools and a bit of patience, you can achieve a professional-looking Chrome Delete that enhances the overall appearance of your Tesla.
Key Points
- Prepare your vehicle by washing and drying the exterior to ensure a clean surface for the modification.
- Gather the necessary tools and materials, including a heat gun, trim removal tools, and a cleaning solution.
- Remove the chrome trim carefully, taking note of the clips and screws that hold it in place.
- Clean and prepare the area where the chrome trim was removed, using a cleaning solution and a soft cloth.
- Apply a trim restorer or a paint protection film to protect the exposed areas and give your Tesla a sleek, modern look.
Tools and Materials Needed

To complete a Tesla Chrome Delete, you will need the following tools and materials:
- Heat gun: This is used to heat the adhesive that holds the chrome trim in place, making it easier to remove.
- Trim removal tools: These are specialized tools designed to help you remove the chrome trim without damaging the surrounding paint or trim.
- Cleaning solution: This is used to clean the area where the chrome trim was removed, removing any adhesive residue or dirt.
- Soft cloth: This is used to wipe down the area and remove any cleaning solution or debris.
- Trim restorer or paint protection film: This is applied to the exposed areas to protect them from the elements and give your Tesla a sleek, modern look.
Removing the Chrome Trim
Removing the chrome trim is the most critical part of the Tesla Chrome Delete process. It’s essential to be careful and patient, as the trim can be fragile and the adhesive can be strong. Start by heating the adhesive with a heat gun, then use a trim removal tool to gently pry the trim away from the vehicle. Work your way around the trim, taking care not to damage the surrounding paint or trim.
| Chrome Trim Location | Removal Tips |
|---|---|
| Front bumper | Use a heat gun to heat the adhesive, then use a trim removal tool to pry the trim away from the vehicle. |
| Rear bumper | Be careful not to damage the surrounding paint or trim, as the chrome trim can be fragile. |
| Side moldings | Use a soft cloth to wipe down the area and remove any adhesive residue or dirt. |

Cleaning and Preparing the Area

Once the chrome trim has been removed, it’s essential to clean and prepare the area. Use a cleaning solution and a soft cloth to wipe down the area, removing any adhesive residue or dirt. This will help ensure a smooth, even surface for the trim restorer or paint protection film.
Applying Trim Restorer or Paint Protection Film
Applying a trim restorer or paint protection film is the final step in the Tesla Chrome Delete process. This will help protect the exposed areas from the elements and give your Tesla a sleek, modern look. Follow the manufacturer’s instructions for application, and make sure to apply the product evenly and smoothly.
In conclusion, the Tesla Chrome Delete is a popular modification that can enhance the appearance of your vehicle. By following the steps outlined in this guide, you can achieve a professional-looking Chrome Delete that gives your Tesla a sleek, modern look. Remember to be patient and take your time, as the process can be delicate and requires attention to detail.
What is the Tesla Chrome Delete?
+The Tesla Chrome Delete is a modification that involves removing the chrome trim from the exterior of a Tesla vehicle to give it a sleek, modern look.
What tools and materials do I need to complete a Tesla Chrome Delete?
+To complete a Tesla Chrome Delete, you will need a heat gun, trim removal tools, cleaning solution, soft cloth, and trim restorer or paint protection film.
How do I remove the chrome trim from my Tesla?
+To remove the chrome trim, heat the adhesive with a heat gun, then use a trim removal tool to gently pry the trim away from the vehicle. Work your way around the trim, taking care not to damage the surrounding paint or trim.
Meta Description: Learn how to complete a Tesla Chrome Delete with our comprehensive guide, including tools and materials needed, step-by-step instructions, and expert tips.